

To print labels from Google Sheets, start with a clean sheet, choose the label size, put your sheet columns on one label design, preview the page, export a PDF, and print it at 100% / Actual Size.
This guide is for normal label jobs: product labels, barcode labels, QR labels, name badges, classroom labels, shipping sheets, and mailing lists. If you only need mailing addresses, use How to Print Address Labels from Excel or Google Sheets or start with Address Label Maker.
Google Sheets Label Maker
Design and print labels directly from Google Sheets rows. Add text, barcodes, QR codes, or images, and export print-ready PDFs.
Quick Answer
Use one Google Sheets row for each label. Import the sheet, choose the matching Avery, Letter, A4, or custom label layout, add the text, logo, picture, barcode, or QR code you need, connect each item to the right column, preview the page, then export a PDF and print at 100% / Actual Size.
If you only need addresses, use Address Label Maker. For product labels, barcode labels, QR labels, classroom labels, name badges, or custom layouts, use Label Designer.
Pick the Right Starting Point
| What you are printing | Useful sheet columns | Start here |
|---|---|---|
| Address labels | name, address, city, state, zip | Address Label Maker |
| Product labels | product_name, sku, price, image_url, copies | Label Designer |
| Barcode or QR labels | sku, barcode, qr_url, caption | Bulk Barcode Generator or Label Designer |
| Avery sheet labels | package number, row data, label text | Avery label sizes guide |
| Partially used sheets | row data plus first unused label position | partially used label sheet guide |

Label Designer overview: create printable labels from a spreadsheet
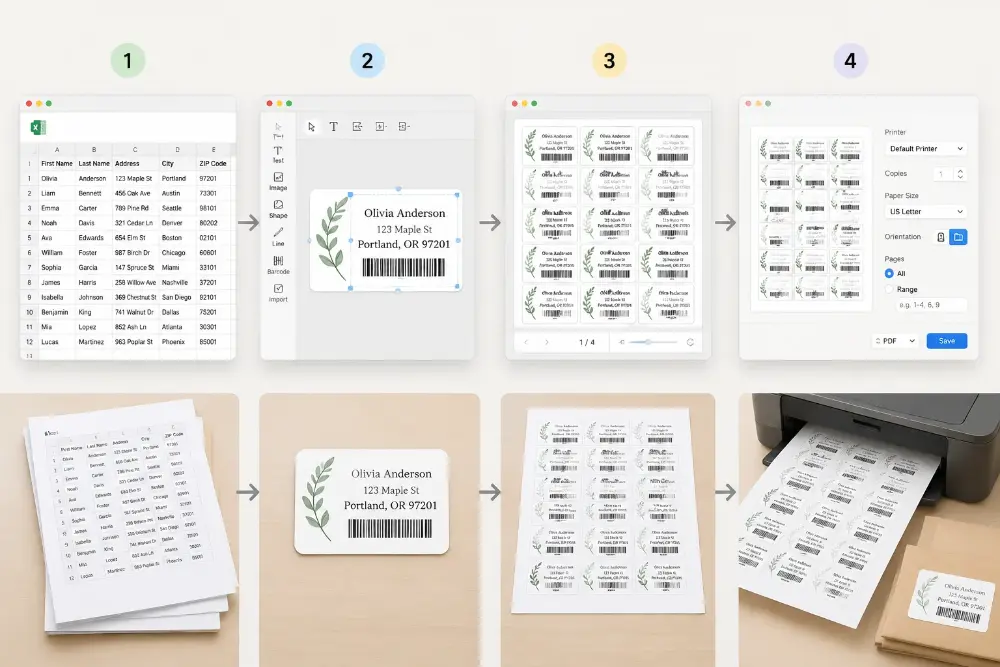
The Basic Steps
- Clean the sheet.
- Import the Google Sheet.
- Pick the label size.
- Put the sheet columns on the label.
- Preview the full page.
- Export the PDF and print at 100% scale.
You do not need to design the labels inside Google Sheets. The sheet should just hold the data.
Most label jobs need:
- one Google Sheet with the real rows
- one label design that repeats
- one PDF you can print on label paper
The label tool handles the layout. Google Sheets stays as the list.
Watch the Full Label Designer Workflow
The videos below match the same workflow described in this guide. They are useful if you want to see where each button lives before opening your own sheet.
| Step | Watch | What it covers |
|---|---|---|
| 1 | Import label data | Bring rows in from Google Sheets, Excel, CSV, XML, paste, or manual entry |
| 2 | Choose a label template | Pick Avery-style sheets, thermal labels, product labels, or a custom size |
| 3 | Design and connect fields | Place text, images, barcodes, QR codes, and dynamic spreadsheet fields |
| 4 | Check print layout | Preview the full sheet, margins, gaps, start position, and paper settings |
| 5 | Export a print-ready PDF | Generate the final PDF and print at 100% / Actual Size |
For a product-first version of the same workflow, open Label Designer. For searchable product documentation, use the Google Sheets label workflow docs.
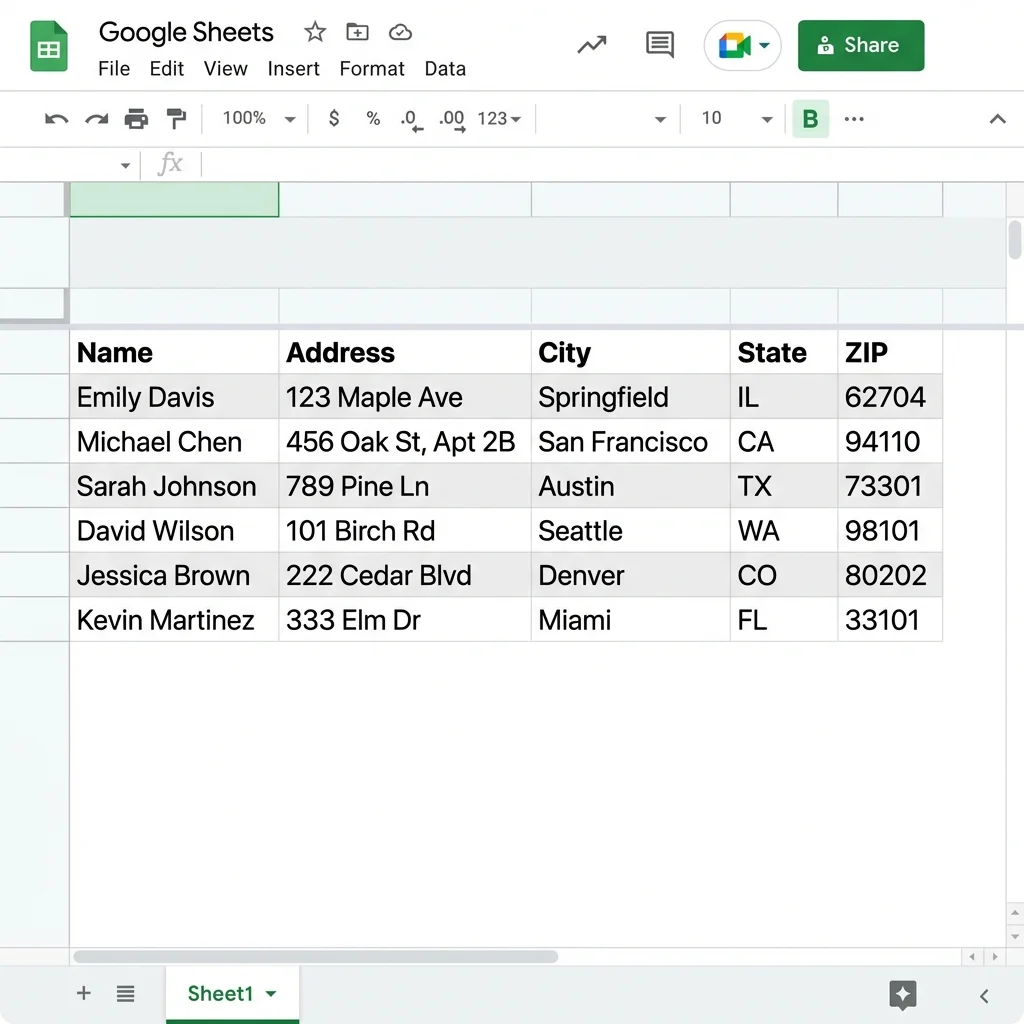
Recommended Google Sheets structure
Typical columns depend on the label type:
- mailing sheets:
name,address,city,state,zip - product labels:
product_name,sku,price,barcode - inventory labels:
item_name,asset_id,location,qr_url - shipping labels:
recipient,street,postal_code,country
Before you import
- Put headers in Row 1.
- Remove blank rows in the middle of the list.
- Keep values formatted consistently.
- Use one row per label.
- Only keep columns that really need to print.
Step-by-Step: How to Print Labels from Google Sheets
Step 1: Clean the sheet first
Google Sheets works best when the data is simple and stable.
Check these items before import:
- every label belongs to exactly one row
- header names are clear
- spelling and capitalization are final
- long values are cleaned up before printing
- blank rows are removed
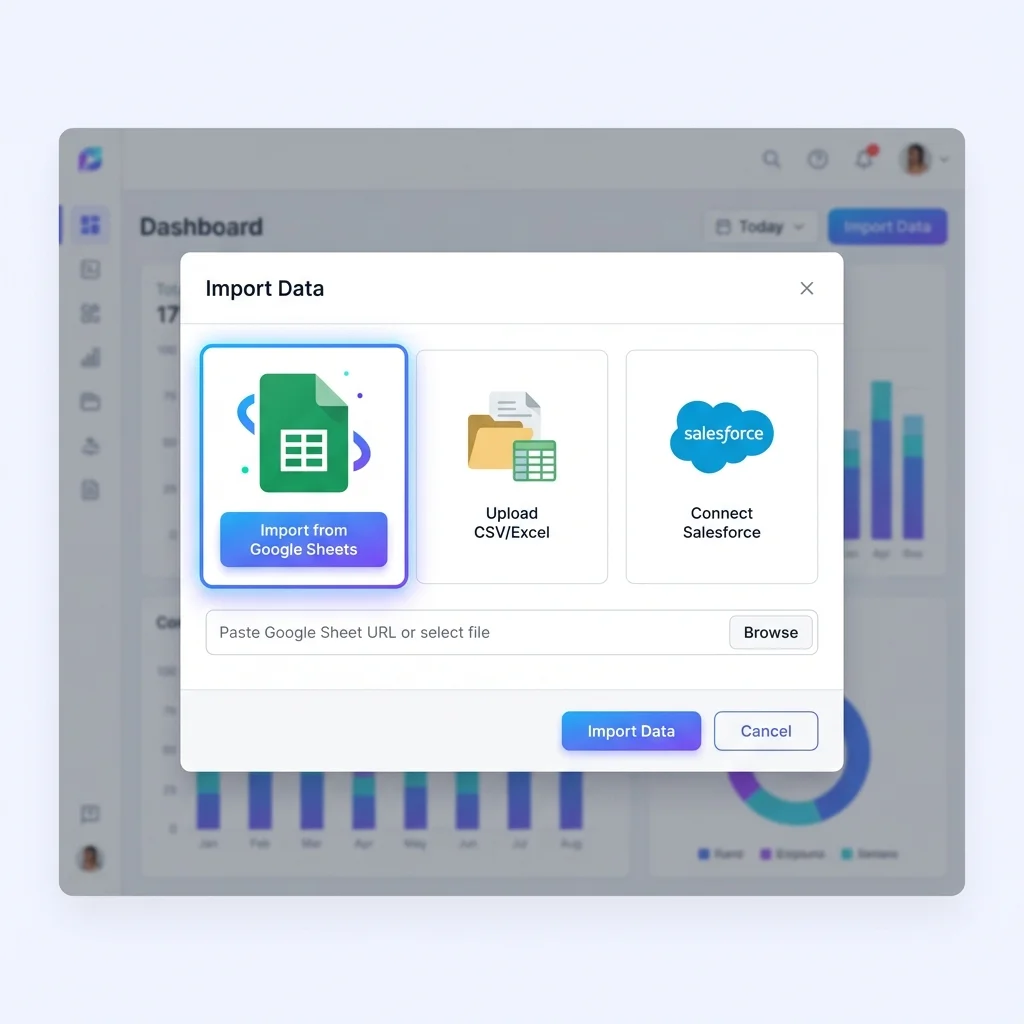
Step 2: Choose how to bring the sheet in
You have two practical options:
- Use the Google Sheets import flow at Import Data.
- Export the sheet as CSV if that is simpler for your setup.
For mailing-only jobs, the easiest path is Address Label Maker. This article continues with mixed label types.

Step 1: import or edit label data
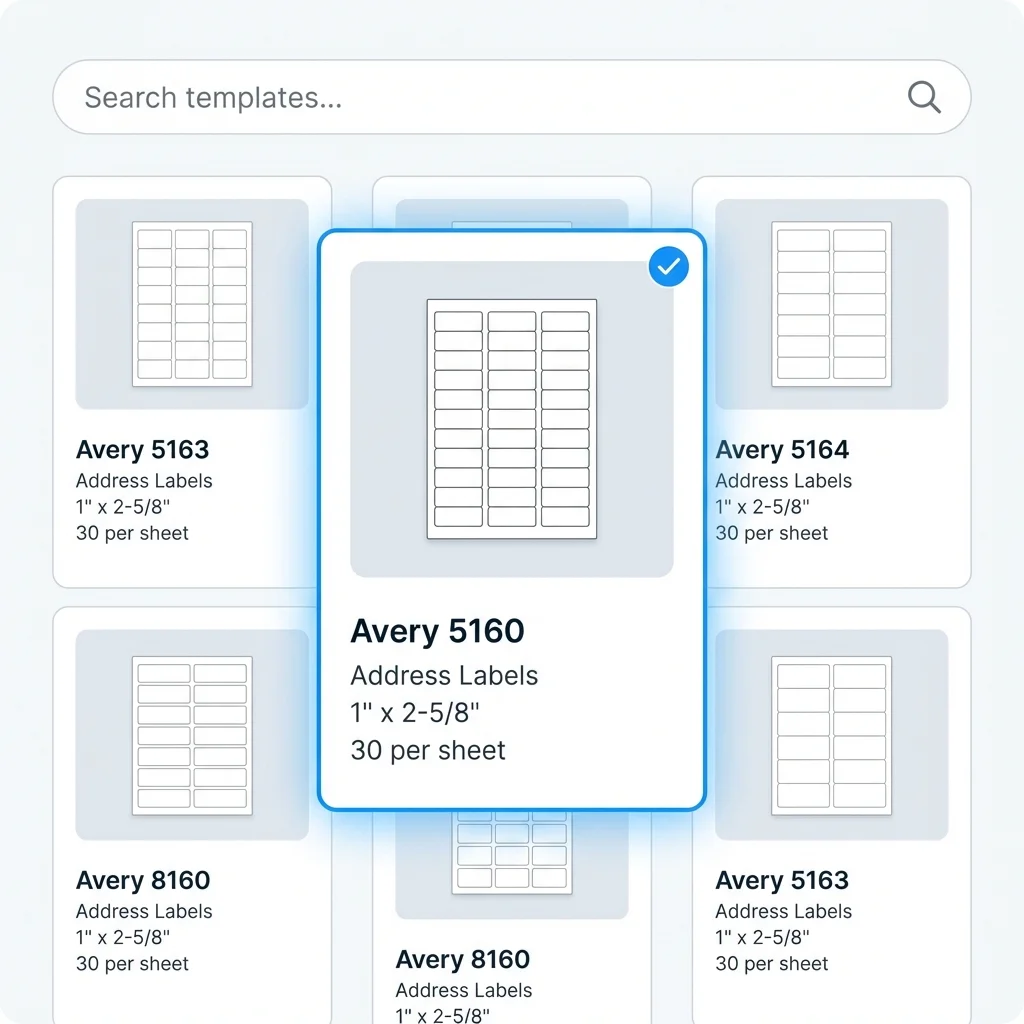
Step 3: Pick the label layout
Before making the PDF, decide what you are printing:
- mailing sheets such as Avery 5160
- return address labels
- product labels
- barcode labels
- shipping labels
- custom A4 or US Letter sheet layouts
If your job is mainly mailing addresses, start with Address Label Maker. If you need more control over barcode, product, QR, or custom sheet layouts, use Label Designer.

Step 2: choose a label template or sheet layout
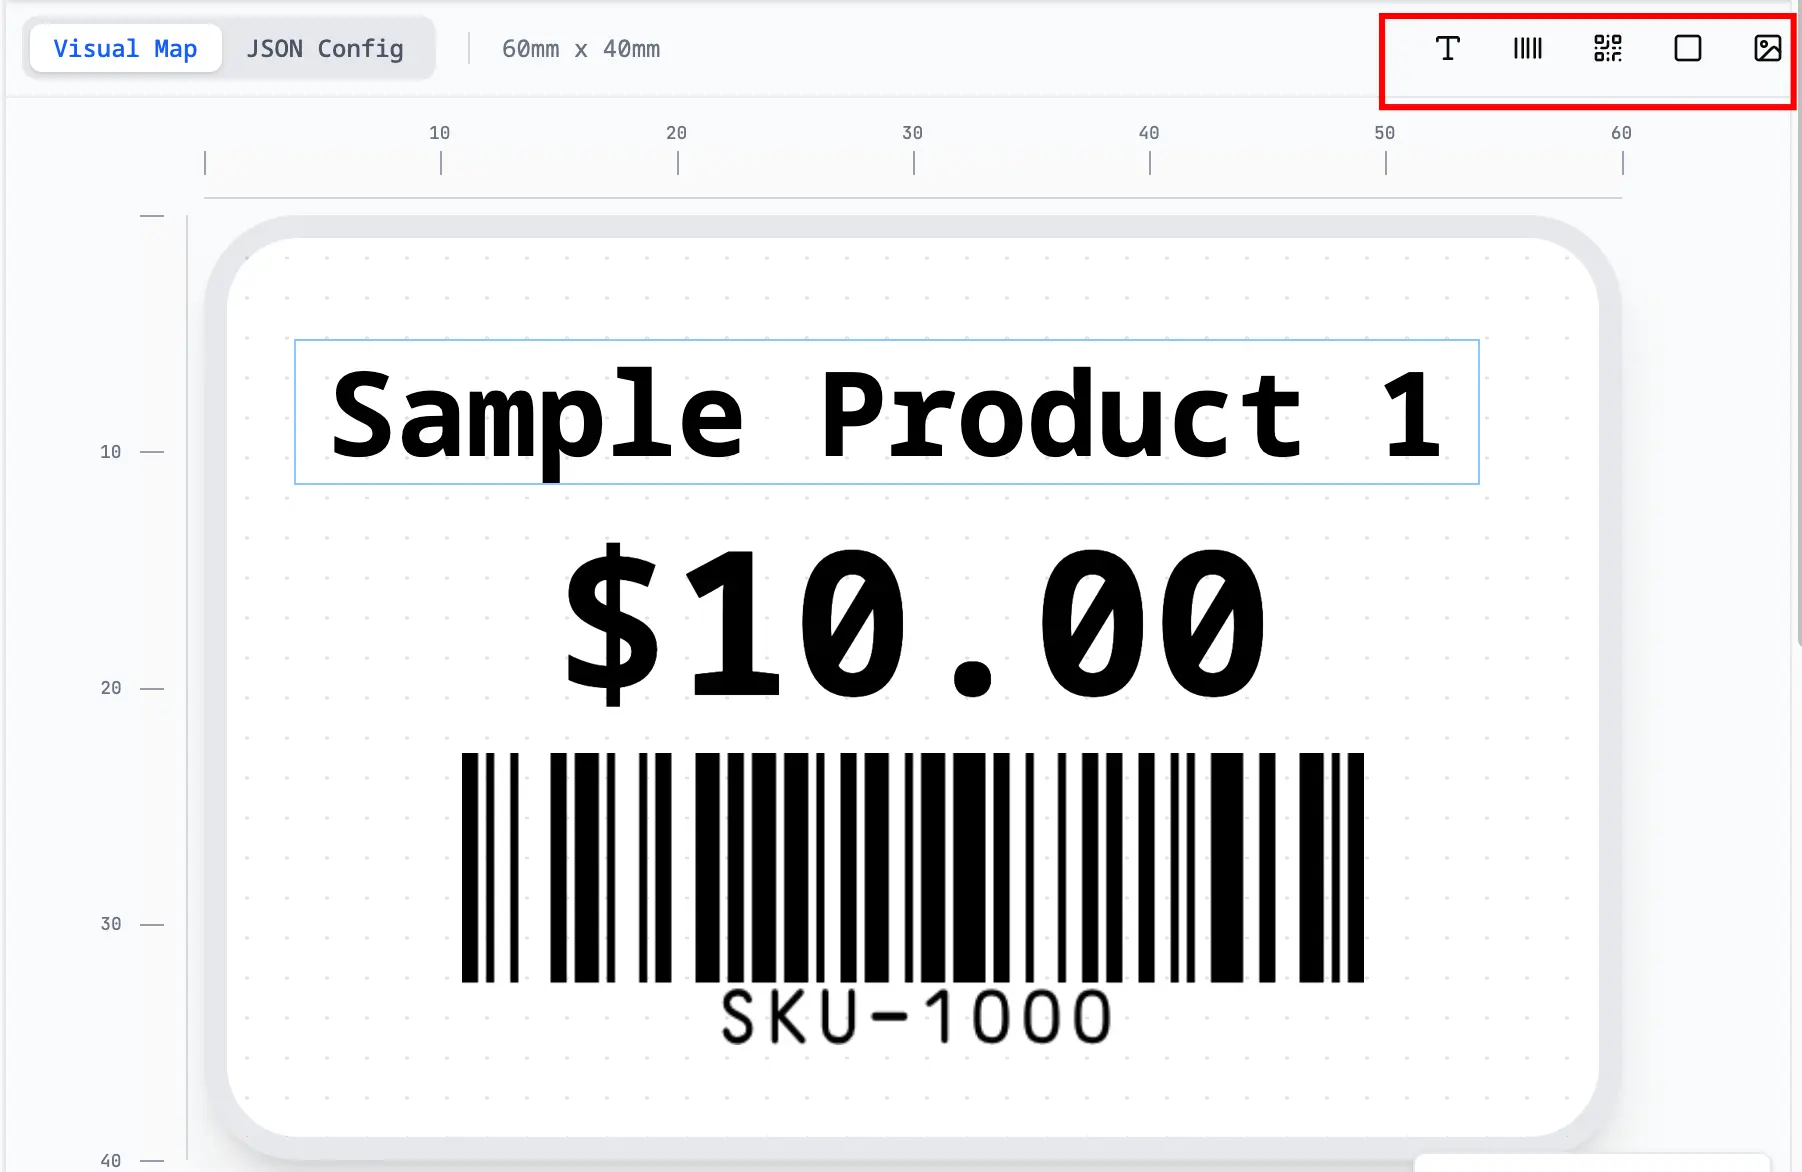
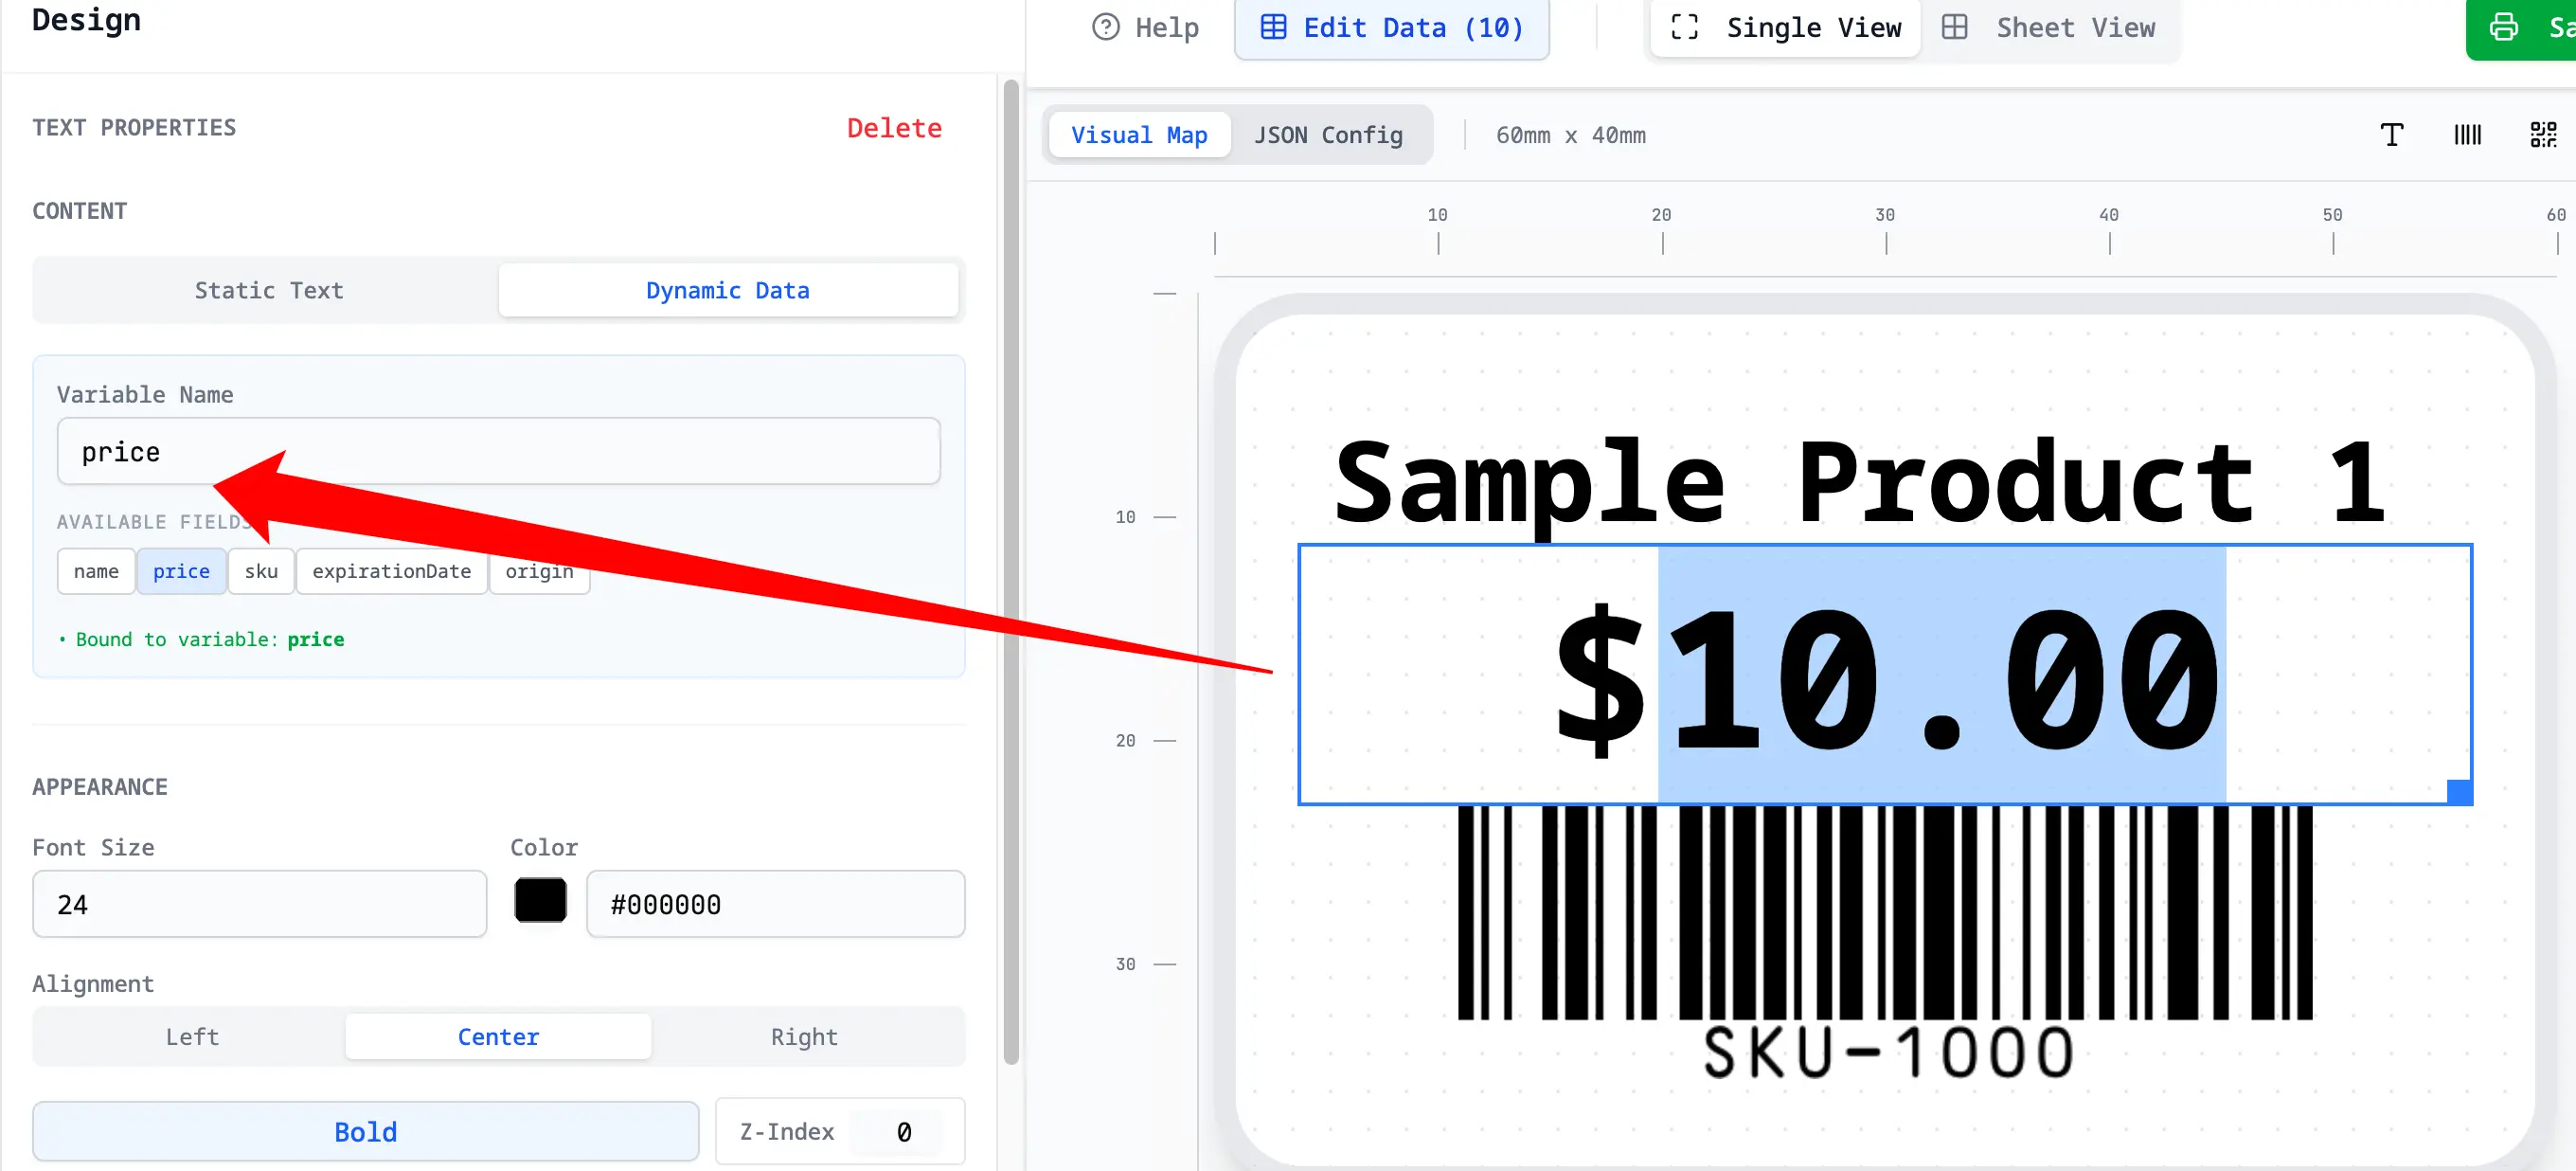
Step 4: Put sheet fields on the label
After import, choose which column should appear on each part of the label:
nameto the main text lineaddressto the address blockpriceto a text template such as${{price}}skuto barcode or textqr_urlto a QR code elementimage_urlto an image element when each row needs its own product photocopiesorquantityto the number of labels to print for that row, if your tool supports copies
You only design one label. The tool fills it with different rows from your Google Sheet.
You can drag fields into position, resize text, add a barcode or QR code, place a logo, and preview real rows while you work. That is much easier than editing each label one by one.
For example, one product label can use:
{{product_name}}
SKU: {{sku}} - ${{price}}
The design stays the same. The values change for each row.

Step 3: design labels and connect spreadsheet fields
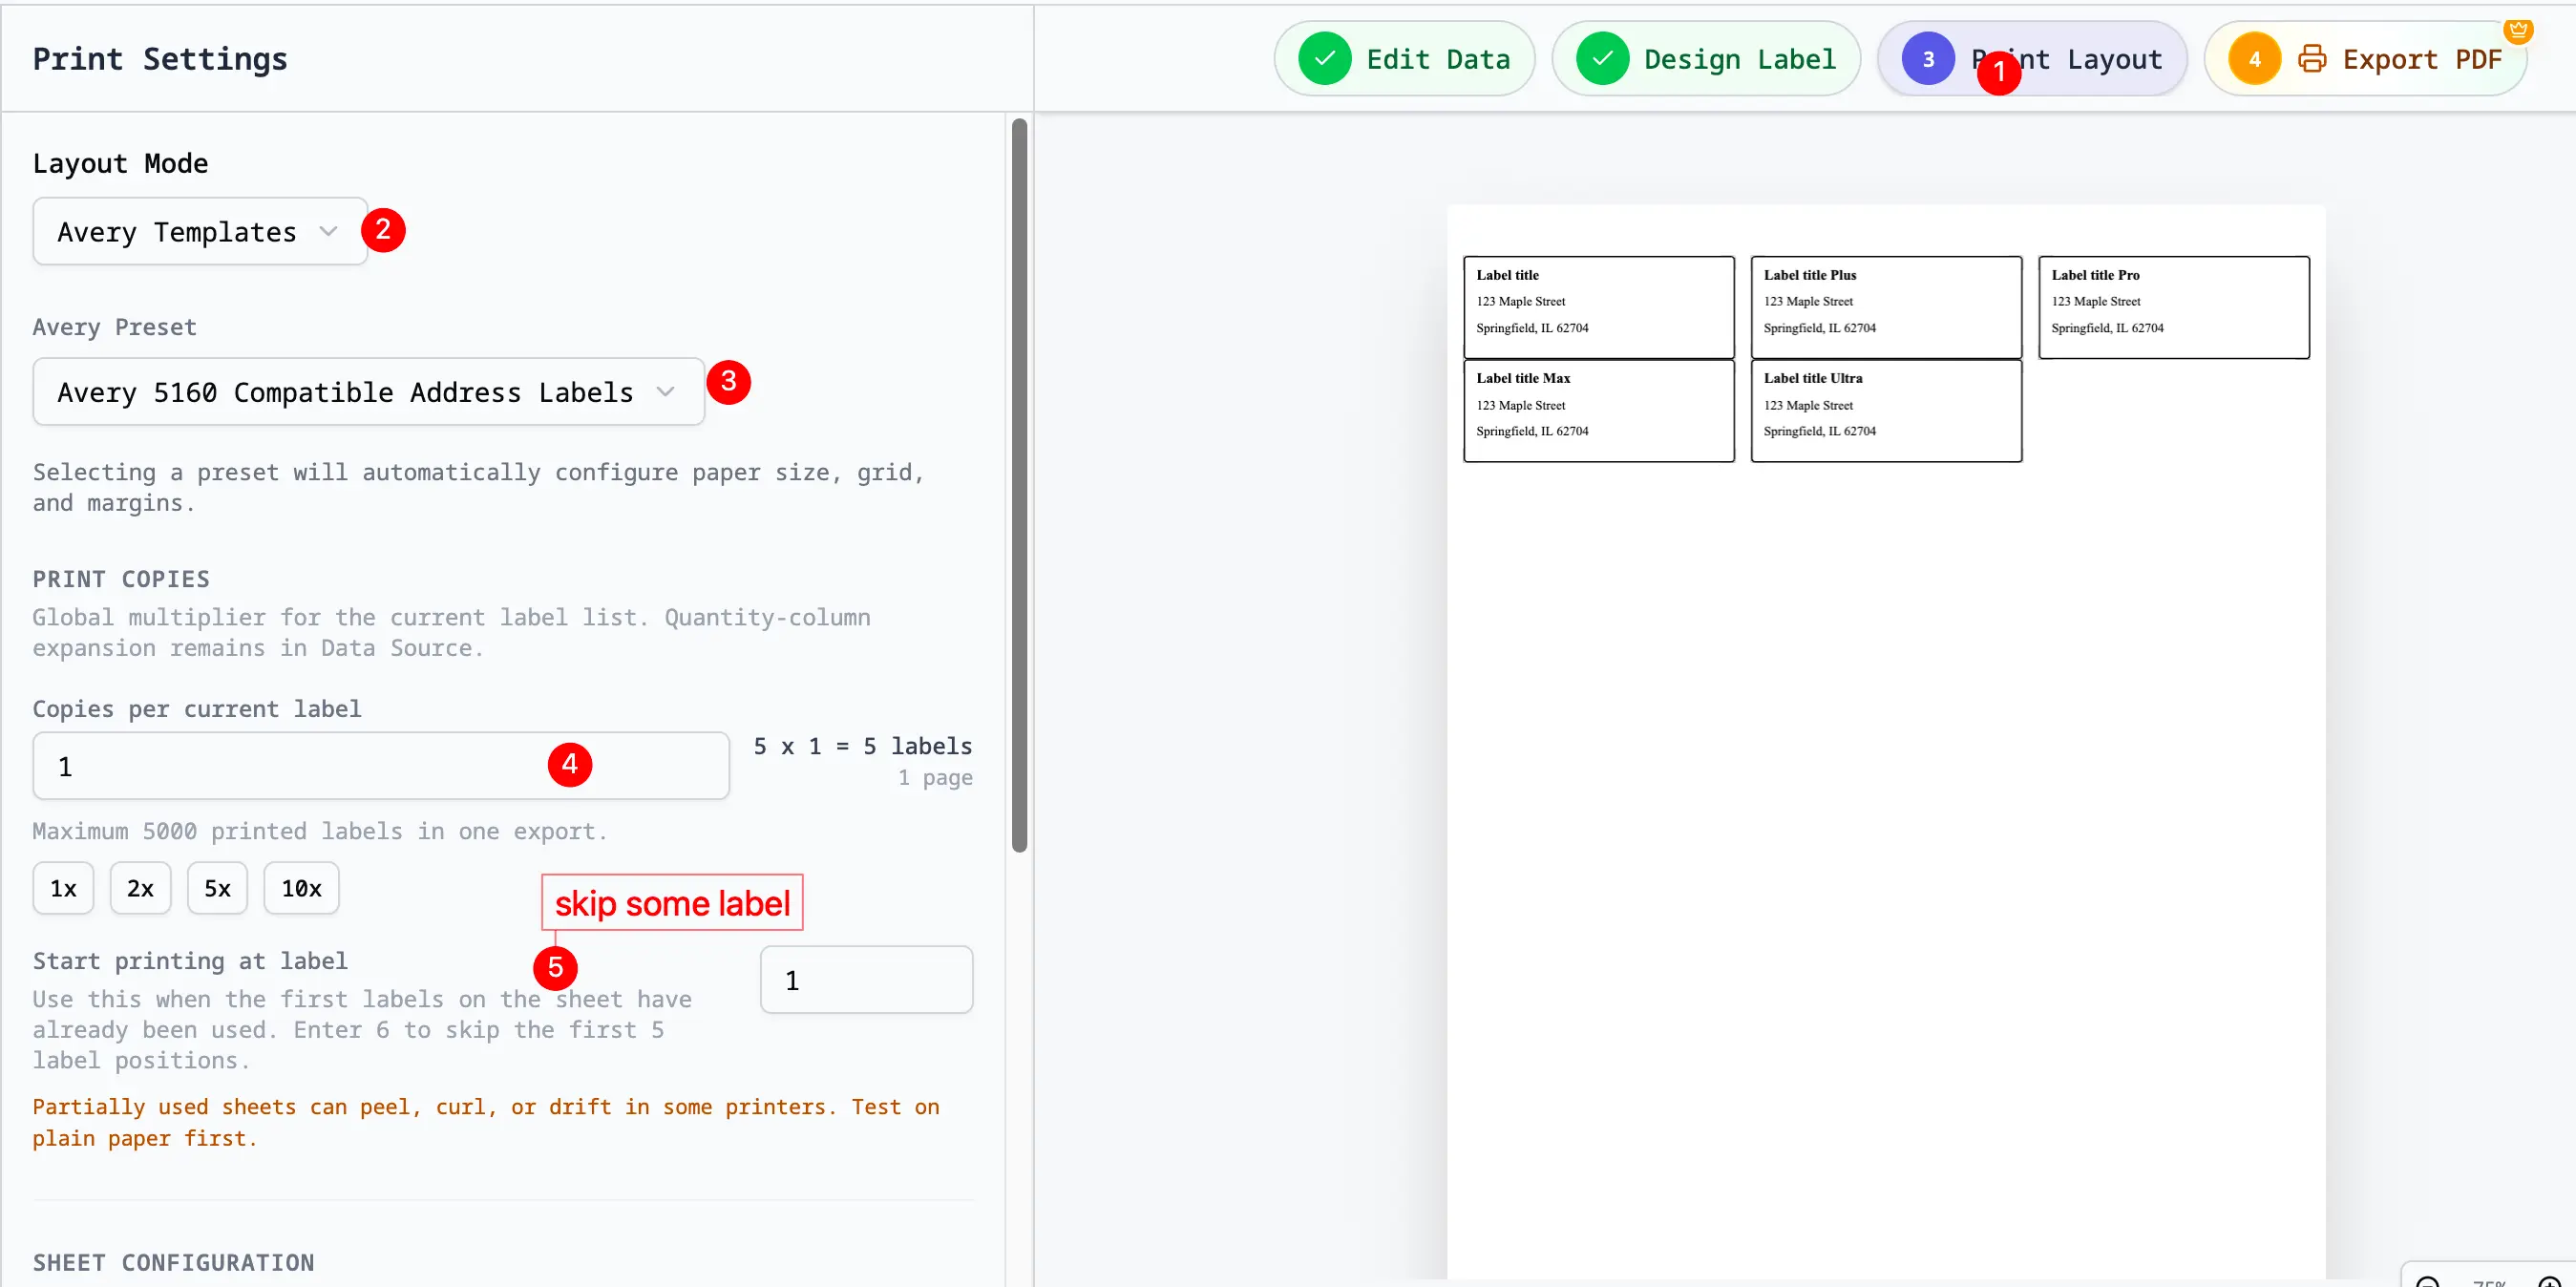
Step 5: Preview the full page
Before exporting, scan the preview for:
- long names wrapping badly
- blank labels caused by blank rows
- ZIP or postal codes losing formatting
- barcodes using the wrong source column
- logos or images covering important text
- copy counts producing too many or too few labels
- labels that look fine alone but break in the full sheet layout
- text templates leaving awkward punctuation when optional fields are blank
Fix the sheet first, then refresh or re-import. That is faster than repairing the exported PDF later.

Step 4: preview the print layout
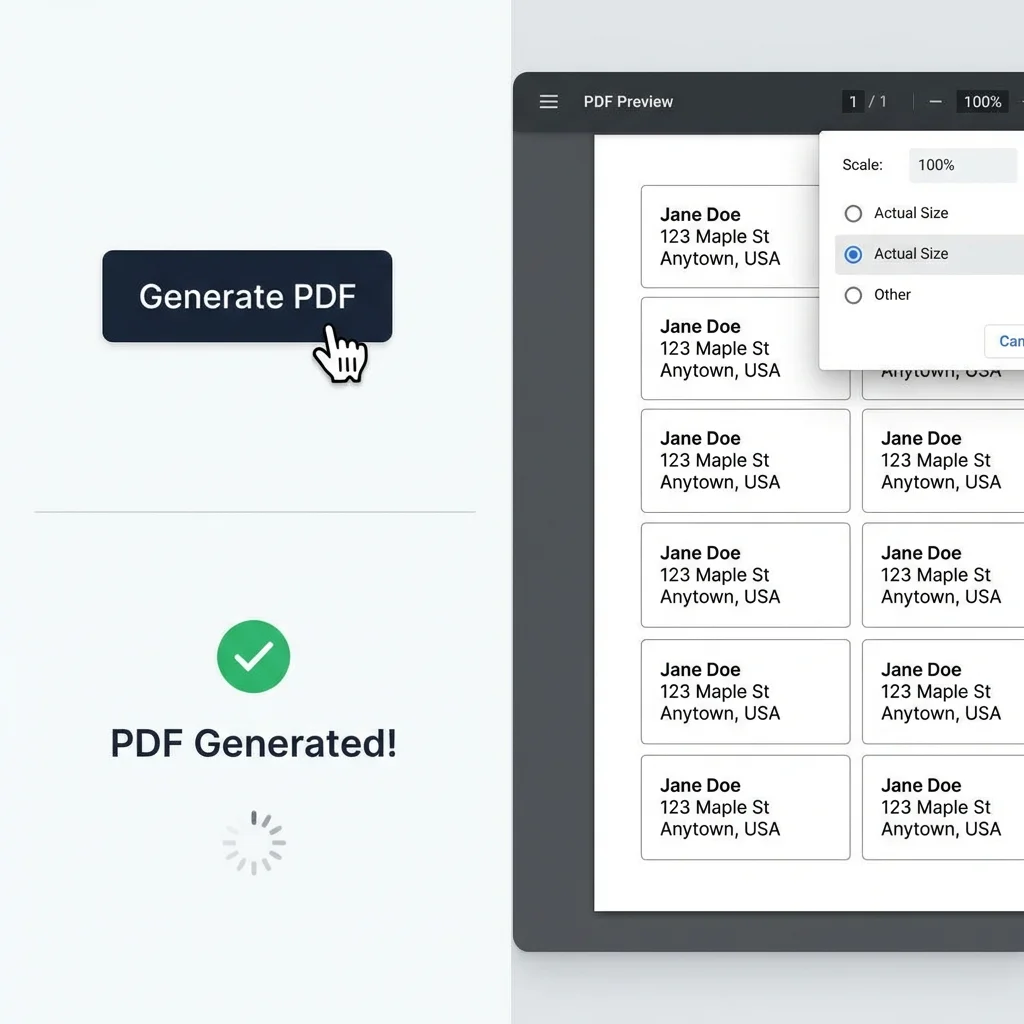
Step 6: Export the PDF and print at 100% scale
When the preview looks right:
- Export one PDF for the labels.
- Open it in Acrobat or Preview.
- Print on label stock or plain paper for a test run.
- Set scale to
100% / Actual Size. - Run one alignment test before the final print.
For most setups, that one setting, 100% / Actual Size, is the difference between aligned labels and wasted stock.

Step 5: export a print-ready PDF
Add a Logo or Picture
There are two simple ways to use images:
| Image type | Use it when | How to handle it |
|---|---|---|
| Static logo | Every label needs the same logo | Add the logo once on the label |
| Row picture | Each row needs a different product photo or icon | Put the image link in a column such as image_url |
For a logo, keep it small. Product labels often look better when the logo sits in a corner. Address labels usually need the address to be the easiest thing to read.
For row pictures, use image links that anyone can open. Test a few rows before printing the full sheet. A broken link or a huge photo can make the label look wrong.
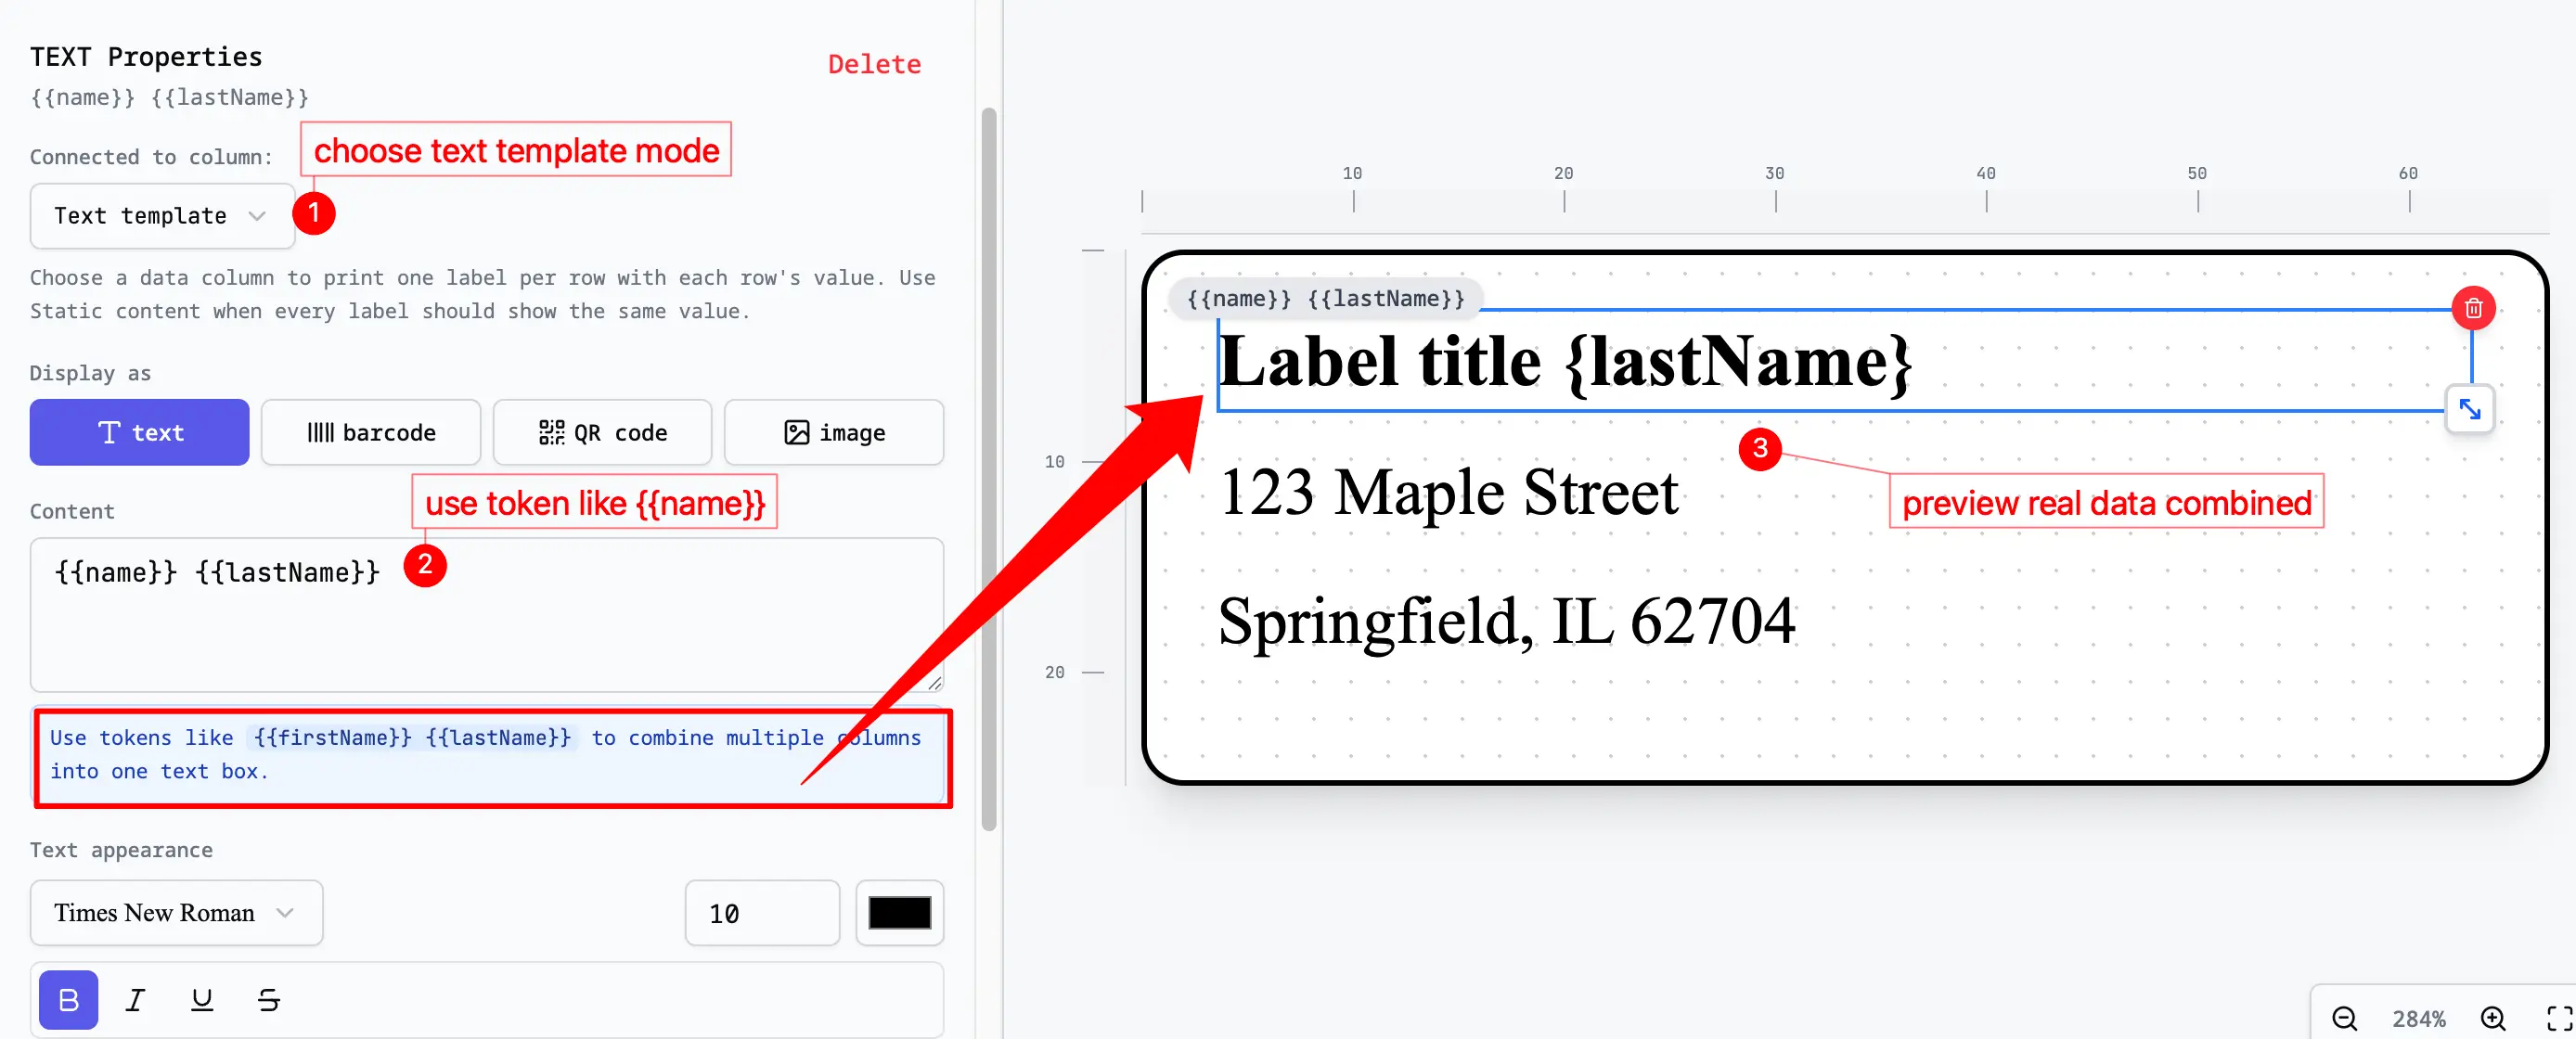
Combine Columns in One Text Box
Sometimes one text box needs more than one Google Sheets column. A text template lets you write the fixed words and leave spaces for the sheet values.
Examples:
{{product_name}}
SKU: {{sku}} - ${{price}}
{{name}}
{{address}}
{{city}}, {{state}} {{zip}}Batch: {{batch_number}}
Best before: {{expiry_date}}Use templates for simple repeated text. Do not use them to hide messy data. If names, prices, or addresses are inconsistent, clean the sheet first.
Print More Than One Copy
Sometimes one row needs more than one label. For example, one product might need 24 stickers.
Use one of these approaches:
| Method | Use it when |
|---|---|
Add a copies or quantity column | Your label tool can repeat a row |
| Duplicate rows in Google Sheets | The tool prints one label for each row |
| Split the sheet into smaller groups | Different people or printers handle different labels |
Before printing, check the preview. A row with copies = 24 should make 24 labels, not one label that says 24.
Skip Labels You Already Used
If the first few labels on an Avery sheet are already gone, do not move the whole design down by hand. Use a start-position setting.
Count label positions from left to right, top to bottom. If the first 5 labels are already used, set the first printed label to position 6. The PDF should leave the first 5 label spaces blank, then place the first Google Sheets row on the sixth physical label.
This is most useful for Avery 5160, Avery 5167, return address labels, product-label sheets, and other multi-label sheet layouts. For a full walkthrough, read How to Print on a Partially Used Label Sheet.
Small Editor Tips
After the sheet is imported, you will usually arrange a few things on the label: text, logo, image, barcode, or QR code. These small shortcuts help.
| Action | Shortcut or method | When it helps |
|---|---|---|
| Paste text | Copy text from another app, then paste it on the label | Add a fixed warning line, event name, school name, or product note |
| Paste an image | Copy an image, then paste it on the label | Add a logo, icon, or small product graphic |
| Duplicate an element | Ctrl+D on Windows or Cmd+D on Mac | Make a second text box, image, barcode, or divider |
| Undo | Ctrl+Z on Windows or Cmd+Z on Mac | Go back after a mistake |
| Redo | Ctrl+Y on Windows, or Cmd+Shift+Z on Mac | Bring back an edit after undo |
After using shortcuts, preview a few real rows. This matters if you pasted a logo near text, copied an element, or placed something close to the edge of the label.
Common problems when printing labels from Google Sheets
Some labels are blank
Blank rows in the Google Sheet often create blank output rows. Delete them before import.
ZIP codes lost leading zeros
Keep ZIP and postal code columns as text in the source sheet before importing.
The PDF does not line up with Avery stock
Print scaling is usually the issue. Make sure the PDF viewer is not using Fit, Shrink, or another auto-scaling mode.
The logo is too large or covers the label text
Make the logo smaller, then preview rows with long text. A logo can look fine on one short sample but cover a long product name or address.
Images from Google Sheets do not appear
Check that the image links are public. If the image needs a login, it may not appear. For one logo used on every label, place the logo on the label design instead of putting it in the sheet.
Multiple copies did not print
If you use a copies or quantity column, make sure it is connected to the copy setting. It should not just appear as text on the label.
I updated the sheet but the labels did not update
Refresh or import the sheet again before exporting.
I only want to print one label on an Avery sheet
Use one row of data and set the first printed position to the unused label spot. For example, if the first 10 Avery 5160 labels are already used, start at label 11.
Frequently Asked Questions
Can I print labels directly from Google Sheets?
You can keep the data in Google Sheets. For printing, it is usually easier to import the sheet into a label tool, place the columns on the label, preview the page, and export a PDF.
Can I use Avery 5160 with Google Sheets?
Yes. Use a 30-up Avery 5160-style layout, place your Google Sheets columns on the label, preview the page, and print at 100% / Actual Size. If you are not sure which layout matches your package, use the Avery label sizes guide.
Can I add a logo to labels from Google Sheets?
Yes. Add the logo to the label design if every label uses the same image. If each row needs a different image, put a public image link in a Google Sheets column.
Can I combine multiple Google Sheets columns into one label line?
Yes. Use a text template such as {{city}}, {{state}} {{zip}} or SKU: {{sku}} - ${{price}}.
Can I print multiple labels for each Google Sheets row?
Yes, if your label tool supports a copies or quantity column. Otherwise, duplicate the row in Google Sheets before import.
Can I skip used labels on a sheet?
Yes. Count the first unused label position and use a start-position setting so earlier spots stay blank in the PDF.
Can I print barcode or QR labels from Google Sheets?
Yes. Put the barcode value, SKU, serial number, or QR URL in a column, then connect that column to a barcode or QR element. Preview a few rows and test scan the printed labels before printing everything.
When Google Sheets Is a Good Fit
Google Sheets is a good starting point when:
- multiple people edit the list
- inventory or mailing data changes often
- you want to avoid repeated CSV exports
- the spreadsheet is the list everyone already uses
If you are working from a static file export instead, the better article is Excel to Labels. If you specifically want mailing addresses from Excel or Google Sheets, use How to Print Address Labels from Excel or Google Sheets.
Start with the Right Tool
If your list is in Google Sheets, start with Google Sheets to Labels. If the job is mainly addresses, use Address Label Maker. If you need to place logos, pictures, barcodes, or QR codes freely, use Label Designer.
Related Reading
- Need mailing labels specifically? Read How to Print Address Labels from Excel or Google Sheets.
- Need Excel instead? Read The Ultimate Guide to Printing Labels from Excel Spreadsheets.
- Comparing label designer software? Read Label Design Software Comparison.
- Need more editor details? Read Dynamic Text Templates and Shapes.